Introduction
A sitemap is a crucial tool for SEO, helping search engines like Google understand the structure of your website and index its pages efficiently. Submitting your sitemap to Google Search Console ensures that Google can discover and crawl your site faster, improving your visibility in search results.
Table of Contents
How to submit sitemap to google
Sign in to Google Search Console, choose your site, go to Indexing → Sitemaps, paste your sitemap URL. Usually https://yourdomain.com/sitemap.xml (Yoast) or https://yourdomain.com/sitemap_index.xml (Rank Math). Then click Submit and check the status. Make sure you’re using your canonical URL version (https and www or non-www) and that the sitemap URL loads in a browser without errors.
This guide is designed for small business owners, marketers, and website managers who want to optimize their websites for search engines. If you’re looking for an easy way to submit your sitemap and improve your site’s search rankings, follow these simple steps.
Prerequisites
Before submitting your sitemap, make sure you have the following:
✔ A Google Search Console account (https://search.google.com/search-console)
✔ Your website verified in Google Search Console
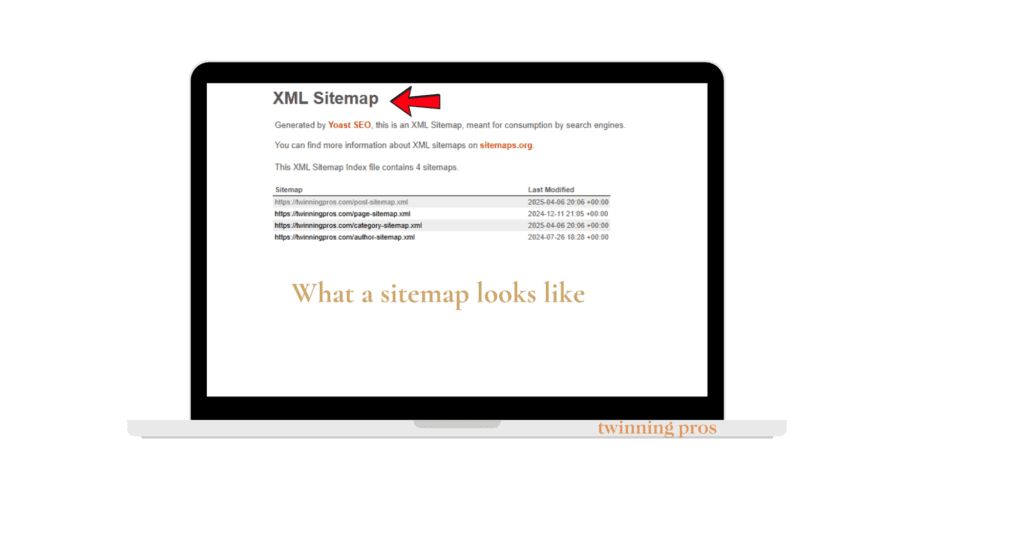
✔ A sitemap generated for your website
Most website builders automatically generate a sitemap for you. If you are using a content management system (CMS) like WordPress, Squarespace, or Shopify, your sitemap is likely already available.
Finding Your Sitemap URL
Your sitemap is usually located at one of these URLs:
- WordPress (Yoast SEO, Rank Math, or All in One SEO plugins):
- Example:
yourdomain.com/sitemap_index.xml
- Example:
- Squarespace:
- Example:
yourdomain.com/sitemap.xml
- Example:
- Shopify:
- Example:
yourdomain.com/sitemap.xml
- Example:
- Other Website Builders:
- Most platforms follow the same format:
yourdomain.com/sitemap.xml
- Most platforms follow the same format:
If you are unsure, check your platform’s documentation or use an SEO plugin to generate a sitemap.
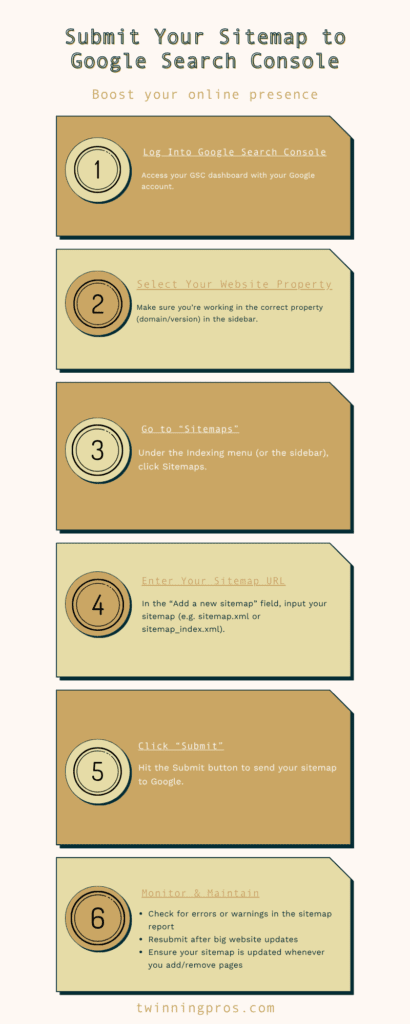
How to Submit Your Sitemap to Google Search Console Step 1: Log in to Google Search Console
Go to Google Search Console and sign in using your Google account.
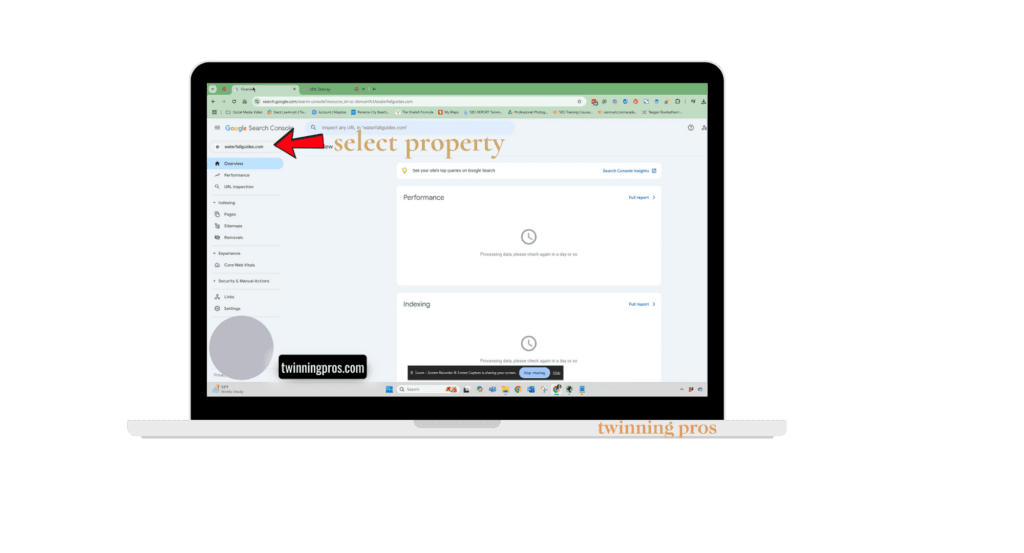
Step 2: Select Your Website Property
Once logged in, choose the correct website property from the dropdown list. If your website is not listed, you may need to verify it first.
Step 3: Navigate to the Sitemaps Section
On the left-hand menu, click Sitemaps under the “Indexing” section.

Step 4: Enter Your Sitemap URL
In the “Add a new sitemap” field, enter your sitemap URL (e.g., sitemap.xml). Since your domain is already selected, you only need to enter sitemap.xml instead of the full URL.

Step 5: Click Submit
After entering the sitemap URL, click the Submit button. Google will now start processing your sitemap and indexing the pages listed in it.


Checking Your Sitemap Submission Status
Once submitted, you can check the status of your sitemap:
- In the Sitemaps section, you will see a list of submitted sitemaps.
- Look under the Status column for messages like:
- ✅ Success – Your sitemap has been processed successfully.
- ⚠ Couldn’t fetch – Google was unable to access your sitemap.
- 🚫 Blocked by robots.txt – Your sitemap is being blocked from crawling.
If your sitemap has an error, ensure:
✔ The URL is correct and accessible in a browser.
✔ Your robots.txt file is not blocking Google from crawling your sitemap.
Best Practices for Keeping Your Sitemap Updated
- Automate sitemap updates: Use SEO plugins like Yoast SEO (WordPress) to automatically update your sitemap when new pages are published.
- Resubmit after major changes: If you redesign your website or add/remove many pages, resubmit your sitemap in Google Search Console.
- Monitor for errors: Regularly check your Google Search Console for sitemap errors or coverage issues.
Conclusion
Submitting your sitemap to Google Search Console is a simple yet essential step in optimizing your website for search engines. Keeping your sitemap updated and monitoring Google Search Console for indexing issues will help ensure that your website remains visible in search results.
Next Steps:
✔ Keep your sitemap updated.
✔ Improve internal linking to make your site structure stronger.
✔ Track performance in Google Search Console.
Need help with SEO? Twinning Pros Marketing specializes in optimizing websites for better rankings and increased traffic. Contact us today!
Frequently Asked Questions
Where do I submit my sitemap in Google Search Console?
Open Search Console → Sitemaps → paste your sitemap URL (for example, https://example.com/sitemap.xml or https://example.com/sitemap_index.xml) → Submit. “Submitting” just tells Google where the file lives; you don’t upload it.
Which sitemap URL should I use?
Use the full, absolute URL of your sitemap or sitemap index (e.g., /sitemap.xml or /sitemap_index.xml if your CMS/SEO plugin creates one). Google recommends placing it at the site root.
Do I need to resubmit my sitemap after updates?
Not usually. Google will recrawl sitemaps periodically. If you make big changes, you can resubmit to nudge a fresh crawl.
How long until my pages are indexed after I submit?
There’s no guaranteed timeline. Google may fetch the sitemap immediately, but crawling and indexing can take time and isn’t guaranteed for every URL.
What formats and limits does Google support?
Google supports XML, RSS/Atom, and plain text sitemaps. Each sitemap can contain up to 50,000 URLs or be 50MB uncompressed; split larger sites and use a sitemap index.
Should I also add the sitemap to robots.txt?
Yes. Optionally add a Sitemap: https://example.com/sitemap.xml line to robots.txt. Use a fully-qualified URL; you can list multiple sitemaps there.
Can I still “ping” Google about my sitemap?
No. Google deprecated the sitemaps ping endpoint; use Search Console, the API, or robots.txt instead.
Why do I see “Couldn’t fetch” or other errors?
Common causes include a blocked sitemap (robots.txt), wrong URL (404), server issues, or a manual action. Click into the error in the Sitemaps report for details and fix, then resubmit.
What does “URL not allowed” or “URL not in property” mean?
Your sitemap includes URLs outside the scope of the property (e.g., wrong protocol or subdomain). Verify the correct property (prefer a Domain property) or submit the sitemap under the matching URL-prefix property.
Should I include noindex/duplicate URLs?
No. List the canonical URLs you want shown in search. Google uses lastmod when it’s accurate and ignores changefreq and priority.


SEO for Beginners
Learn from the SEO Strategist who has 75+ first page Google rankings under her belt.
We’re marketing nerds and business strategists that have generated millions of dollars in client revenue. We're sharing the systems and strategies to help your growing business with marketing that actually converts.
We're Tiffany + Tabatha
")


Comments